Kids Christmas Craft: Mini Tree

This mini Christmas tree project will help get your kids in the Christmas spirit. I gave this project to my five year old niece to complete. She loves her tree and it makes a great decoration in our living room.
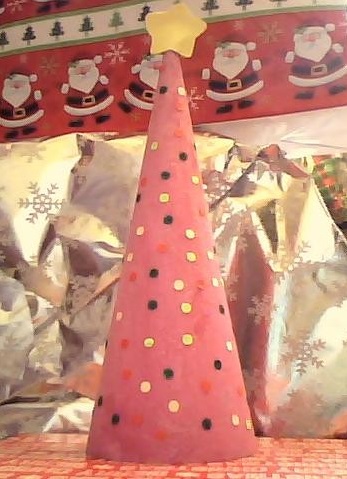
My niece choose the tree color and picked out the various colors she wanted for the tree topper and the ornaments. One of her favorite colors is pink so she choose to make her tree pink and then we added sparkles. While the tree dried we punched out holes from various papers to make the ornaments. We alternated between a glue stick and regular glue to stick them on. The regular glue works best when you dab it on to the cone for the child and they apply the paper dots. My niece attempted to apply the glue on her own and ended up getting too much glue on the cone. She loves her tree and it makes a great decoration in our living room.

Time required: 1 hr
Difficulty: easy
Cost: Under $5
Materials:
- Various colored papers
- Paint
- Paintbrush
- Sparkles
- Tracer
Tools:
- Hole punch
Instructions:
1. Make a cone using poster paper or purchase an paper mache cone from you local craft store. I went with the paper mache tree because it was more sturdy for my niece as she is paint happy and her paint always is applied thick. I was worried she may soak the tree. You can choose any color for the tree.
2. While wet sprinkle sparkles all over the tree to give it a more glamorous effect.
3. Use your hole punch to punch out small circle shapes to use as tree ornaments. Glue on the dots with a glue stick.
4. For the star top. I used a star cookie cutter and traced out to starts. I glued around the edges of the star but left a small opening to push the top of the tree. You can use ornaments instead by pulling out the hooks adding a little bit of glue to the top of the tree to hold it in place.
Christmas Tree Decoration
Making a Tree Out of Paper
To make a beautiful Christmas tree for your table you do not need a paper Mache cone. You can use gift wrap, poster paper or scrapbook paper. Just roll your paper into a cone shape and use a glue stick or tape to secure the cone in place.
Kids could even use some of their own drawing to form the tree and give it a unique appearance.
The Tree Base
Another inexpensive option to create a forest of Christmas trees is to use a package of party hats as your base. Plain colored hats would work best if kids are planning to decorate their Christmas trees with stickers, but any color would work.
The only draw back is the size of the trees will be uniform so as not to allow size variation.
How to Make a Cone
- How to Make a Funnel or Cone from Paper: 3 Steps (with Pictures)
If you need to make a cone shape you could try creating your own template using a circular shape, a rule and scissors. Note: cone height will be determined by the radius of the circle used to create the template. - Here's a Cone Template for Your Craft Projects (Large, Prints 2 Per Page)
"These paper cone templates will make it easy for you to make paper cone confetti holders and decorations quickly without the need for a compass."
Cone Tree Christmas Tutorial
Items You Could Use to Decorate Your Trees
Ideas
| More Ideas
| More Ideas
| Ideas Continued
|
|---|---|---|---|
feathers
| ribbon
| beads
| feather boa
|
construction paper
| fabic
| gems
| pasta noodles
|
stickers
| scrap book paper
| lace
| glitter
|
Construction Paper Christmas Tree
There are so many ways you to decorate your cone shaped tree. The video above gives a. tutorial on how to create a festive holiday look using red and green circles. Use a punch to punch out the shape you want and slowly glue them to the base slightly overlapping the circles as you go. You stop when you reach the top. You can use other construction paper cut outs to decorate your basic tree as well


