How to Make a Clay Pot Bride

Here Comes the Bride!
The great thing about clay pot crafts is they are cute, easy to make and most importantly inexpensive. Are you looking for a fun simple clay pot craft project to make? If you are this clay pot craft bride craft tutorial will be perfect for you.
This clay pot craft tutorial will show you step by step how to make a clay pot bride. This tutorial will feature illustrated instructions to make the project easier to follow. The Terra cotta clay pot bride craft will make a great gift for the bride-to-be or a great project to keep the kids busy; In addition, you can turn this craft project into a fun bridal shower game.
Below find the free clay pot bride craft tutorial, links to other clay pot craft projects, and more. For a detailed list of page contents check out the table of contents .
Table of Contents
Materials Needed ♥ Step One ♥ Step Two ♥ Step Three ♥ Step Four ♥ Step 5 ♥ More Clay Pot Craft Information ♥ Clay Pot Craft Blogs ♥ Clay Pot Crafts on the Web ♥ Guestbook

Clay Pot Craft Directions
How to Make a Clay Pot Bride
Materials Needed
1 Clay Pot
1 Wooden Doll Head
Lace
White Paint
Facial color
Black permanent marker
Orange Raffia
Small flowers bouquet
White chenille stems
Craft Glue
Remember...
Flower pot people are fun to make! A little paint and creativity go a long way.
The whole family will have a blast creating these decorations.
Clay Pot Craft: Bride Step One
It all begins with a stroke of a brush
The first thing we need to do is grab our paint brush (I usually use a foam brush) and our white paint.. At this time we will also need our clay pot. For this project I used a 2.5 inch rose pot (A rose pot is a clay pot with a narrower base and a bigger lip) . You can use a bigger size pot if you would like to create a larger clay pot bride.
Remember: Allow ample drying time between each coat of paint. If you do not you will just be moving the paint around and thinning out the first layer of paint and creating a bit of a mess that will eventually need more layers of paint.
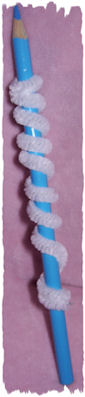
Now put the painted clay pot aside and pull out your wooden doll head. I chose a 2.25 inch head because I like having a slightly bigger head. You can use a smaller one for a less exaggerated look. To make sure you find a size that you like grab you rose pot in the craft store and take it over to isle with the wooden doll heads and try them on for size. Paint you wooden doll color whatever color complexion you would like. You may want to mix your own color to get the color you want. Allow drying time between each coat and then place it aside.Next grab a pencil and your two white pipecleaners. Take the first one and wrap it tightly around the pencil. Slide the pipecleaner off the pencil. Repeat with the other piper cleaner. You have just created your clay pot craft arms.
Want to Make Your Clay Pot Bride Sing?
Add a bell to make your bride ring. Take a bell and a piece of string or ribbon and run it through the bell. Slide the string through, placing both sides together, the small opening in the bottom of the clay pot. Once the string is through tie a knot. Put some glue on the bottom of the clay pot. Once the string is through the small opening tie a knot. Put some glue on the bottom to hold the string in its place. Hold firmly for a few minutes until it adheres to the terra cotta pot.
Take your newly created arms and your miniature bouquet of flowers and place them in your work area. Straighten slightly one end of your arm in order to wrap it around your bouquet tightly. Do the same with the other pipecleaner arm.
When you are done it should appear as if the arms are out stretched holding the flower bouquet. The other end of the arms will be attached in the next step.
Do Not Look Under the Dress!
Want to keep people from seeing the inside of you clay pot bride? Grab a piece of white felt and a marker place the clay plot down on the felt and trace around the opening of the flower pot. Cut out the circle, run a bead of glue along the rim of the clay pot and attach the felt circle.
It is now time to make your clay pot bride's wedding gown. Make sure your rose pot is upside down with the opening touching the table. Run a small bead of glue along the lip of the rose pot. Work your lace around the pot to create the bottom layer of your dress. Press firmly as you attach the lace.
Find the middle of the pot and run your bead of glue on the top lip of the lace. Slowly press the lace to the pot until it is wrapped neatly around the pot.
Now you will need to pull out the arms you made in the previous step. For each arm straighten the end of the coil a few millimetres (the unattached end). Run some glue around the bottom of the pot where you think the arms would come from. Each arm will have to be held in place for about five minutes or until the glue firmly takes hold of the pipecleaner.
Finally run a bead of glue around the bottom of the clay pot. Take your last layer of lace and press it to the bottom of the pot.
You have now created your bride's dress. If you find the top layer of lace is pulling away from the body you can put a dab of glue in a couple of places to hold down the top layer.
There are many hair styles to choose from for your clay pot bride and just as many ways to make hair. You can draw it, paint it or glue it on to the head. You can use synthetic doll hair, wool, or raffia.
For this project I chose orange raffia. Mainly because I had a lot left over from creating my clay pot elf. After glueing the wooden doll head to my base I took the raffia and ran it over the head to determine the length I wanted. I cut about a two dozen strips of raffia and bundled them up with a piece of raffia in the center.
Note: If you do not want the bride to have bangs you do not have to make the second bundle; instead, just add a few more strands of raffia to the first bundle.
Next I cut another two dozen pieces but this time I bundled them together closer to the top. The bundled tied in the middle I glued to the top of the head so that it went from side to side on the head. The second bundle I glued on over top of the first but from front to back. The shorter length went to the front of the head to create bangs. Carefully spread out the strands of hair so they cover the head nicely. If you find gaps in your hair just take some raffia and glue it under the bundle to fill in the bald spots.Turn Your Clay Pot Craft into a Bridal Party Game
This game is a great alternative to toilet paper bride. All you have to do is paint the doll heads and clay pots before hand. Supply one set for every two or three people to work on. Provide ribbon, lace or tulle for each table. Make sure you have glue, scissors and markers available for the guests. There are myriad of other decorating choices for you to add. Set a time limit for the game and allow the bride-to-be judge the winners. Hand out small prizes to the winners. After you can collect all the dolls in a box for the bride-to-be to take home as a souvenir of her bridal shower.
Question Time!
Would you rather make clay pot brides or play toilet paper bride?
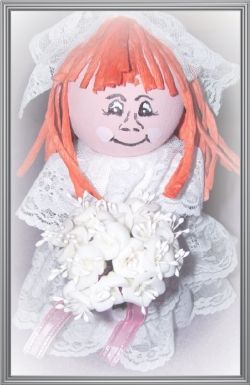
Clay Pot Craft: Bride Step 5
We appraoch the finish line
We are almost done. It's time to add the finishing touches to your beautiful flower pot bride. Take a piece of lace and line the edge with glue. Attach it to the head making sure to cover the raffia knot that will be showing. This will be the bride's veil.
Next we will move onto the face. I usually draw my face on with a fine tip marker. I feel it gives me more control and gives me the best result; however, in this sample I tried painting on the face. Unless you are great with paintbrush, which you can see I'm not, I'd go with the marker or you could try rub on faces that they sell at the local craft store.
Take a rest and survery your work. You have just completed your very own clay pot bride.
Thanks for visiting!
What do you think about the Clay Pot Bride Craft? Did you find this tutorial useful? I hope you did. Share your thoughts, comments or suggestions below:)


